Showing posts with label Free Felt Patterns. Show all posts

Saturday, February 8, 2014

Felt Food Marshmallow Peeps Pattern

Morning everyone! Nice weekend to start off with a free felt food pattern of marshmallow peeps. 

 
Using this pattern you can make whatever color marshmallow peep you want for every holiday. Since Valentine's Day and Easter are almost here; red and pink seem to fit nicely for these upcoming holidays. 

Over at Dusty Bottom Acres, Stephanie has offered a free felt pattern to you in PDF file format (easy to print) of these marshmallow Easter peeps. 


A big thanks to Stephanie at Dusty Bottom Acres for sharing her personal pattern.

Have you made some Marshmallow Peeps of your own? Feel free to share in the comments below with a link to your site.


If you liked this post please share with your friends.

Friday, February 7, 2014

Felt Food Sandwich Pattern and Felt Food Chips with Bag Pattern

YeY, It's Friday everyone! So happy that it's the end of the week. Had some rain yesterday here in Southern California. Sure enjoyed it. 
Photo Credit: Amanda from SnazzleCraft Blog


Well here's another two patterns to add to our free felt food pattern list. Over at SnazzleCraft.blogspot.com, Amanda has offered this amazing detailed pattern absolutely free to all you crafty felt food lovers. 

Photo Credit: Amanda from SnazzleCraft
She has a free print out of the patterns for the bread of the sandwich, tomato, chips, chip bag with logo, cheese, lettuce and even some peanut butter & jelly spread. So nice that she has allowed others to use her personally made patterns for others to enjoy as well.


Did you make a felt food sandwich with delicious fillings or chips & the chip bag? Feel free to share about it in the comments and link back to your site.
  
A big thanks to Amanda at SnazzleCraft for sharing her patterns.


If you enjoyed this post, please share with your friends.


Tuesday, October 8, 2013

Free Felt Food Pattern of Whole Apples for Pretend Play

Hey everyone, great start to the week! Hope you are all having a great day so far. I just want to share a free felt apple pattern from Hiromi Hughes at Felt Cuisine. She has quite the way of creating felt into delicious little bits of food for your child to use in pretend play. 


Who doesn't love a tasty apple? These look good enough to eat. A big thanks to Hiromi for sharing one of her patterns at no cost to you, so you can start sewing your very own apples! Make sure you have Adobe Reader to view this pattern & print. The directions are included as well, so you won't be on your own making this yummy felt apple.


Did you already make your apples? Feel free to share about it in the comments below and link back to your blog/website. Thanks for sharing.

Wednesday, July 3, 2013

How To Make Play Food Chicken Legs, Fish and Burger Patties Out Of Felt

Felt Chicken Nuggets (pattern not included)

Guest post by Shelly Hill
 
For the past 2 years I have been making a variety of play food items out of craft felt for my little grand daughters kitchen play set. All little girls love to have a variety of food items to use with their sets and this three piece set works up quickly.
All three of these food items are made from your standard craft felt and the pieces are hand sewn together using blanket stitches and whip stitches. You can make all three of the pieces in just one afternoon.

Materials Needed For The Project:
1 Sheet of Felt in each of these colors: dark brown, vanilla and tan.
Embroidery Floss: dark brown, vanilla and tan
Poly Fiber Fill Stuffing (about 1/4 of a bag)
Sharp Fabric Scissors, Embroidery Needle and Measuring Tape
Paper Template (to use as your pattern)

Patterns: one 3" diameter circle (for burger), fish shape that is hand drawn that measures 4" long by 2" wide at it's widest point, chicken drumstick that is hand drawn that measures 5" long by 2 1/4" wide at it's widest point.

Hamburger Patty: Use your 3" diameter circle pattern and cut two circles from dark brown felt. Cut a strip that measures 3/8" wide by 10" long from dark brown felt. Using two strands of dark brown embroidery floss, blanket stitch the strip to one of the circles. Once it has been attached, blanket stitch the other edge of the strip to the second circle. Right before you finish stitch it on, insert some fiber fill stuffing and then finish your stitching to close it up. Fasten off your stitching and hide ends of floss inside the patty.

Fish Fillet: Use your hand drawn fish pattern and cut two of the shapes out of vanilla colored felt. Cut a strip that measures 1/4" by the circumference of your fish from vanilla felt. Using two strands of vanilla colored embroidery floss, blanket stitch the strip to one of your fish shapes. Once it has been attached, blanket stitch the other edge of the strip to the second shape. Right before you finish your stitching, insert some fiber fill stuffing and then finish up your stitching to close it off.

Chicken Drumstick: Use your hand drawn chicken leg pattern and cut two of the shapes from tan colored felt. Cut 1 1/2" of the bone end of your pattern off and then use that piece to cut two bone sections from vanilla colored felt. Using two strands of vanilla colored felt, hand sew on the bone section onto the top of the leg pattern using tiny whip stitches. You will repeat this for the other shape. Once those have been attached, use two strands of tan embroidery floss and whip stitch both of the chicken leg pieces together but right before you are done, insert in some fiber fill stuffing and then finish your stitching.

Tips: You always want to hide the ends of your floss inside the piece so that they are not visible and no knots are showing. Don't pull your hand stitches too tightly or the felt will bunch up. If the pieces should get dirty with use, they can be hand washed in a little bit of mild detergent.


About the Author: Shelly Hill is a mother and grandmother living in Pennsylvania who enjoys crafting, sewing, quilting and scrapbooking. You can visit Shelly's online craft blog called Passionate About Crafting at http://passionateaboutcrafting.blogspot.com for free craft project ideas and tips. You can find a photo of this completed project on her blog at http://passionateaboutcrafting.blogspot.com/2011/01/play-food-free-pattern-for-felt-fish.html.
Article Source: http://EzineArticles.com/?expert=Shelly_Hill

Thursday, March 28, 2013

Felt Food Lettuce Pattern and Tutorial


Hey everyone, welcome to a simple felt food pattern for lettuce. Great to use in pretend play for kids; making sandwiches or salads. The little chefs can coordinate any entree' they imagine.
My son is only 23 months old, but I'm prepping my sewing skills now so I'm ready to make him all the fun stuff. Imagination is a great key to a healthy childhood.

Anyways, starting with the simple play food lettuce. First off, print the template below to obtain your free felt food lettuce pattern or you can draw one up on your own and use my steps to give it some character. Read below the pattern for the Felt Food Lettuce Tutorial.

If you don't need any steps then enjoy! Just click link below to print for free.

Free Felt Food Lettuce Pattern


Felt Food Lettuce Tutorial
Supplies:
- 1 piece of Green Felt
- 1 piece of matching Green Embroidery Thread
- 1 Scissors, sharp
- 1 Sewing needle
- 1 copy of pattern
- 1 Roll of tape (scotch tape or packaging tape)

Craft Time:
- 45 minutes


Directions: 
STEP 1 - Cut out each lettuce pattern leaving 1/4" - 1/2" trim around the edges (what ever you feel more comfortable working with) so when you give it it's final cut it comes out clean. If you are wonder why there are lines around the patterns, it's just to help beginners with basic stitching. You can do you're own size and spaced stitching to your liking.


STEP 2 - Cut out a square of felt the size of the lettuce pattern you just cut. Then I have a little trick that I use to get a clean cut around the edges. You're going to tape the pattern to the square of felt, so all edges are covered by tape. This allows the felt not to move when you're cutting.


STEP 3 - Now, cut out your patten along the stitched line with the felt taped to it.  


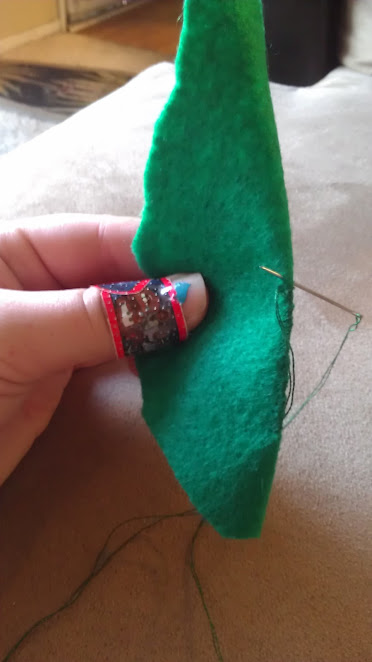
STEP 4 - Next, pinch the center of your lettuce leaf and whip stitch it a few inches up. 

NOTE: If you do not know what a whip stitch is then I will elaborate. Fold your leaf in half; begin at your starting point from the bottom and push your needle through both layers of the felt. Then pull the thread all the way through and do it again. Start from the bottom layer of the felt and push your needle up through both layers. You will start to see the thread wrap around the folded part of your lettuce leaf.


STEP 5 - Knot off your threading and tuck in end into stitching.

NOTE: If you are unfamiliar with knotting of your sewing work, that's no problem. When you get to the end take your needle off. Grab each piece of thread in each of your hands and tie it as if you were tying your shoe. But instead of make a bow, make a knot. I recommend doing this 5 or 6 times to give a strong knot to hold your work together.


And, Wah-la! You are finished! Easy, fun lettuce that you can use in your child's play food sandwiches and salads. Bring out the little chef in your child!


-----------------------------------------------------

Do you want felt food for your child to play with but don't have the time to make it. Check out my online Etsy store "Happy to be Crafty" and you can purchase already made felt food.